Every frontend developer and UI designer needs to be familiar with the Model-View-ViewModel (MVVM) design pattern. Our teams have been using the MVVM design pattern since the days of WPF and it has allowed us to keep our code clean. But what do we mean by clean code? Here are the advantages we have seen by using the MVVM design pattern:
- Each component in the MVVM pattern has a clear responsibility.
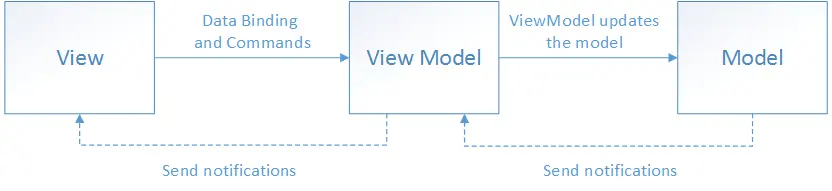
- Models deal with data
- Views deal with how things are presented to the User (e.g. color, fonts, layouts, UI controls)
- ViewModels update the data in the Models
- Models notify ViewModels when data has changed. ViewModels notify Views when data has changed
- Unit Testing each component is simplified
- Code reuse is much easier
If you are new to frontend development or interested in how to get started in software development, check out our blog on how to get started.
1. Your Views should mostly be in XAML and have very little code behind
The view is responsible for defining the what the user sees on the screen. Think about layout, colors, fonts, buttons, etc. In a perfect world, each view would only be defined in XAML. However, you may need to include some code to do presentation type things (e.g. animate a button). The important thing to note is to not include any business logic the view layer. By doing so, your ViewModels and Views will be much easier to unit test.
Testing Views from a unit testing perspective usually does not make a lot of sense. In our experience, using functional tests, QA testers and allowing end users to use your app are much better testing approaches for ensuring your View layer is correct. The Nielsen and Norman group do a great job explaining how to go about User Testing.
2. Use styles to keep your UI looking consistent and to reduce code
Every developer gets frustrated when what seems like should be a simple change isn’t. An example might be changing the background color of your primary button. Far to often developers can cut and paste code to rush code out the door. This is what we call tech debt in the software development industry. This is where having a global ResourceDictionary for your app comes into play. This is where you want to define all of the colors, common layouts and fonts in your application. If you plan on using themes, this is also make your life much easier down the road.
In the image below, this is what an example ResourceDictionary might look like for your application.
					<Application xmlns="http://schemas.microsoft.com/dotnet/2021/maui"
             xmlns:x="http://schemas.microsoft.com/winfx/2009/xaml"
             x:Class="ResourceDictionaryDemo.App">
    <Application.Resources>

        <Thickness x:Key="PageMargin">20</Thickness>

        <!-- Colors -->
        <Color x:Key="AppBackgroundColor">White</Color>
        <Color x:Key="NavigationBarColor">#0033FF</Color>
        <Color x:Key="NavigationBarTextColor">Grey</Color>
        <Color x:Key="NormalTextColor">Black</Color>

        <!-- Implicit styles -->
        <Style TargetType="NavigationPage">
            <Setter Property="BarBackgroundColor"
                    Value="{StaticResource NavigationBarColor}" />
            <Setter Property="BarTextColor"
                    Value="{StaticResource NavigationBarTextColor}" />
        </Style>

        <Style TargetType="ContentPage"
               ApplyToDerivedTypes="True">
            <Setter Property="BackgroundColor"
                    Value="{StaticResource AppBackgroundColor}" />
        </Style>

    </Application.Resources>
</Application>
3. Long running code needs to be done on another thread
Users lose confidence in your app when the UI locks up. There is nothing more frustrating when clicking or tapping on a UI control and it doesn’t respond. Often times when we are developing code, we don’t test with realistic data sets. You only put 15 items in your list control, but in the real world, your user may have 1,500 in a list. Developers need to understand that the UI runs on a single thread. It is a poor design decision to retrieve 1,500 items from a database, then sort and group them. When this occurs it is commonly known as “locking up the UI thread”. The more appropriate way to do this use the async and await pattern. In addition, you should work with your UI designer to give the user feedback that something is going to take awhile. Here is the back pattern for using the async/await pattern:
					void myButton_Click(object sender, RoutedEventArgs e)
{
   Task<string> myTask = GetHtml("http://...");

   Button clickedButton = (Button)sender;
   clickButton.Text = "Please wait...";
   await myTask;
   clickedButton.Text = myTask.Result;
}

///////////////////////////////////////
// This method will take some time to execute
///////////////////////////////////////
async Task<string> GetHtml(string url)
{
  string html = await new HttpClient().GetStringAsync(url);
  return html;
}
Every .NET developer needs to understand how async and await work. It can be confusing at first, but if you know how to use them correctly you will prevent difficult to find bugs from happening. To learn to gory details of async and await, read the Microsoft Docs on asynchronous programming.
4. Update your views when the underlying Model or ViewModel changes
All view model and model classes that are accessible to a view should implement the INotifyPropertyChanged interface. Implementing this interface in a view model or model class allows the class to provide change notifications to any data-bound controls in the view when the underlying property value changes.
You may need to create helper methods that ensure you and your team follow the following design rules:
- Always raising a
PropertyChangedevent if a public property’s value changes. Do not assume that raising thePropertyChangedevent can be ignored because of knowledge of how XAML binding occurs. - Always raising a
PropertyChangedevent for any calculated properties whose values are used by other properties in the view model or model. - Always raising the
PropertyChangedevent at the end of the method that makes a property change, or when the object is known to be in a safe state. Raising the event interrupts the operation by invoking the event’s handlers synchronously. If this happens in the middle of an operation, it might expose the object to callback functions when it is in an unsafe, partially updated state. In addition, it’s possible for cascading changes to be triggered byPropertyChangedevents. Cascading changes generally require updates to be complete before the cascading change is safe to execute.
5. Write tests, write tests, write tests
There is no excuse for skipping out on writing unit tests these days. If you follow the MVVM design pattern, created automated unit tests will make your life easier in the long run. The Models and ViewModels will be straight-forward to test if done properly. Using design approaches like dependency injection and mocking can make testing much easier. To learn more on how to test your UI layer, check out Brandan Jones’s video on YouTube!
Your Ideas
Do you have some some favorite practices, tips or resources for following the MVVM design pattern? If so, tweet them to us at @lftsoftware!